The “account enumeration attack from a single source (using NTLM)” threat detection policy requires thorough investigation to identify the source of the activity and implement remediation. This type of attack is a common initial compromise vector, where a device attempts multiple NTLM authentications using a range of usernames typically found in enterprise environments. These include:
- Common service accounts like “backup,” “legal,” or “support”
- Built-in Windows or Active Directory accounts such as “administrator” and “guest”
- Standard employee username formats like:
- firstname.lastname (e.g., michael.smith)
- firstinitiallastname (e.g., msmith)
- firstname (e.g., michael)
- lastnamefirstinitial (e.g., smithm)
Attackers also frequently try variations, such as foreign language equivalents of “administrator” or usernames with appended numbers (e.g., msmith2).
NTLM
New Technology LAN Manager (NTLM) is an authentication protocol developed by Microsoft to verify users and devices on a network. It uses a challenge-response mechanism, allowing users to authenticate without transmitting their password over the network.
Although NTLM has known security vulnerabilities and is being phased out, starting with the removal of NTLMv1 in Windows 11 24H2 and Windows Server 2025. It remains widely used today due to its compatibility with legacy systems and applications.
Account enumeration and brute force
In general, brute force attacks involve using trial and error to work through possible username and password combinations to compromise an account. These attacks can vary heavily in complexity and are frequently used to gain a foothold within an environment.
Account enumeration is a more specific type of brute-force attack in which the attacker attempts to guess the valid usernames of accounts within an environment. Threat actors use this tactic when they have limited information about their victim’s network.
Once a threat actor has successfully identified existing usernames, they will begin brute-forcing those users’ passwords, hoping to compromise those accounts and gain access to the network. As a result, it is imperative to identify and stop these account enumeration attacks to prevent cyberattacks in their early stages.
Investigation and remediation
The investigation and remediation process can be divided into three areas and five stages. Stages 1 and 2 occur within your Varonis tenant, Stages 3 and 4 take place on a Domain Controller within your environment identified during Stages 1 and 2, and Stage 5 utilizes other tools within your environment to remediate the activity.
Investigation into this activity can be conducted in many ways; however, we recommend starting within the Varonis SaaS platform to gather as much information as possible. Gathering this information at the start will allow us to focus our investigations in Active Directory on only the resources that are involved in the authentication process, speeding up the time to remediation significantly. In the Varonis platform, we can use expanded searches to gather a more complete scope of the activity, which will then be used to filter information and eventually determine the source IP address of the threat actor.
Remediation efforts should focus on blocking authentication attempts once you have identified the source of the malicious authentication, hardening the environment to reduce the attack surface, and limiting future brute force and account enumeration attempts.
The Varonis Platform
Stage 1: Reviewing the alerted events
Included in the alerted events for the “Account enumeration attack from a single source (using NTLM)” threat detection policy are two different types of events, which together correspond to a single authentication attempt.
An example of events from an NTLM enumeration alert.

An example of events from an NTLM enumeration alert.
The two events, NTLM access request and Account authentication (TGT) provide the full picture of authentication attempts, including the source device, target device, username attempted, state of the authentication and more. Because the two events originate from different Windows event viewer logs on the Domain Controller, they are not processed together by Varonis and remain separate within the Varonis UI.
The “NTLM access request” event, which is only available if NTLM auditing has been properly configured on the Domain Controllers and is being ingested into Varonis, will provide information on the device to which the attempted authentications occur. If NTLM auditing is not being ingested into Varonis, this information can be found in the event viewer logs on the Domain Controller. More information on finding these logs can be found below. In Varonis, this event will always be considered successful, regardless of the status of the authentication, as the event focuses on the creation of the access request and is independent of the authentication.
The “Account authentication (TGT)” event will provide details on the attempted username and the state of the authentication. In the alerted events, this will typically be performed by an “Unknown User” as seen above; however, the attempted username can be found in the event description. The status of the event (success/failure) will provide information about the status of the authentication.
Stage 2: Expanding the search
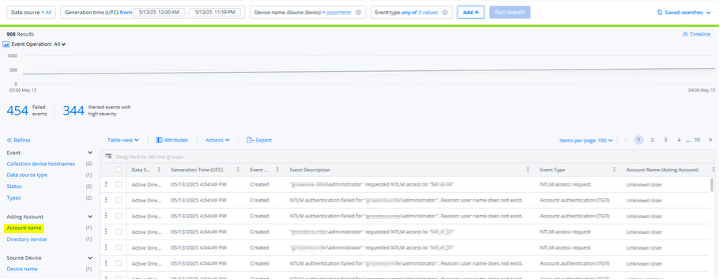
An important step in investigating the activity is identifying any potentially enumerated accounts. To do this, we recommend expanding the event search for the alerted activity based on the source device (if available). Adding a filter for “Event type = Account authentication (TGT), NTLM access request” will expand the search to include all authentications from the device, and the “Account name” facet on the left-hand side of the screen can be used to quickly identify accounts within Active Directory that have authentication attempts from the device.
A screenshot of the Varonis SaaS UI showing an events search for enumeration activity. The highlighted “Account name” facet on the left-hand side can be used to view potentially enumerated accounts.
A screenshot of the Varonis SaaS UI showing an events search for enumeration activity. The highlighted “Account name” facet on the left-hand side can be used to view potentially enumerated accounts.
Additional information that may validate the presence of malicious enumeration attempts includes the source device, as some threat actors use common spoofed device names, such as “mstsc”, “win-*”, “b_*”, “C202*”, “c07s14” and “Rdesktop” to obfuscate their activity, while others leave the device name empty entirely. Other commonly observed spoofed device names include:
- Remmina
- Freerdp
- Windows 7
- Windows 8
- Windows 10
- Windows 11
- Windows 2012
- Windows 2016
- Windows 2019
- Windows 2022
- Windows 2025
If you are seeing generic account names, especially those that do not match your organization’s naming convention, in combination with spoofed or null device names, it is likely that your organization is being targeted by an account enumeration attack.
A further expansion of the search to include all activity from the source device by removing the “Event type” filter can be helpful in identifying accounts the threat actor may be actively brute forcing, as account lockout events are likely to be triggered during the brute force attempts. If an account is determined to be targeted in an enumeration attack, we highly recommend disabling the potentially enumerated account and rotating the account’s credentials.
If the account enumeration is a product of an unnecessarily exposed RDP port on the source device, RDP can additionally be blocked using a GPO, allowing for the configuration to be deployed across the environment as necessary. Within the “PC Configuration > Policies > Administrative Templates > Windows Components > Remote Desktop Services > Remote Desktop Session Host > Connections” tab of the Group Policy Management Editor, the “Allow users to connect remotely using Remote Desktop Services” setting can be configured to disable RDP connections.
The final piece of information that should be gathered at this stage of the investigation is the “Collection device hostnames” facet within the SaaS UI, which can be used to identify the Domain Controller(s) needed to be prioritized during the next stage of the investigation. If NTLM auditing is not enabled in Varonis, we will need additional information to identify the device being attacked.
Active Directory
Stage 3: Preparing NTLM auditing
This section will focus on ensuring the proper configurations are in place to capture the most helpful events for the investigation. If NTLM is already configured in the environment, and you have identified the target device, you can skip to section 5 for remediation.
Specifically, we will need Event ID 8004 in Event Viewer to identify the victim device that received the NTLM brute force attack attempts. Locating the victim device will be the first step in the remediation process.
By default, 8004 events are not enabled and will require a configuration change in specific Domain Controller Group Policies to enable logging. On a Domain Controller, open the Group Policy Management Editor and navigate to the Default Domain Controllers Policy. Once located, right-click on the policy and select Edit.
The Default Domain Controller Policy can typically be found in the Domain Controllers folder within the domain as seen above.
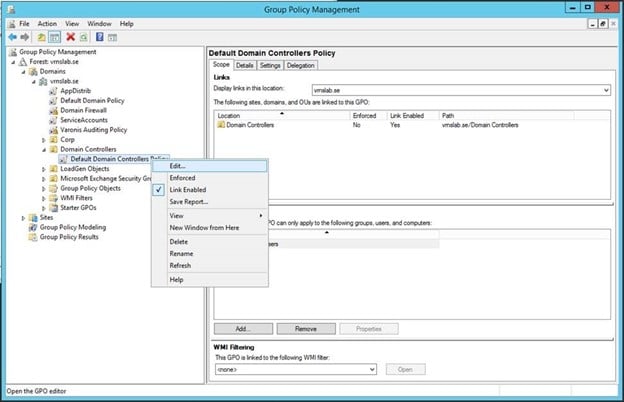
The Default Domain Controller Policy can typically be found in the Domain Controllers folder within the domain as seen above.
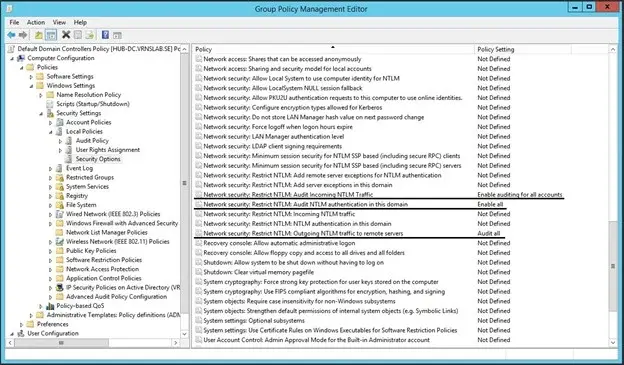
Once the Group Policy Management Editor opens, navigate to Policies > Windows Settings > Security Settings > Local Policies and select Security Options.
The Group Policy Management Editor with the required Security Policies underlined.
The Group Policy Management Editor with the required Security Policies underlined.
Security Policies can be configured by right-clicking and selecting “Properties”. You can then define the Security Policy and select the appropriate value from the dropdown in the Properties window. The security policies that will need to be configured are the following:
- Network Security: Restrict NTLM: Audit Incoming Traffic = Enable auditing for all accounts
- Network Security: Restrict NTLM: Audit NTLM authentication in this domain = Enable all
- Network security: Restrict NTLM: Outgoing NTLM traffic to remote servers = Audit all
The Properties tab of one of the required Security Policies showing a properly configured audit policy. Once configured, click Apply to save your changes.
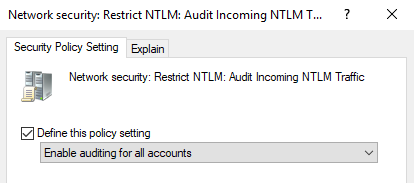
The Properties tab of one of the required Security Policies showing a properly configured audit policy. Once configured, click Apply to save your changes.
The Properties tab of one of the required Security Policies showing a properly configured audit policy. Once configured, click Apply to save your changes.
Once you have applied the changes to Security Policies, run “gpudate /force” on all Domain Controllers to apply the changes made and begin collecting the events.
While not required for this investigation, once remediation has been performed, we highly recommend adding NTLM auditing to Varonis. To ensure the NTLM 8004 events are ingested into Varonis to allow for immediate identification of the source device in future investigations, please review and implement the steps found here: AD Requirements. If you would like assistance with this configuration, please reach out to Varonis Support, who will be happy to assist you.
Stage 4: Investigating NTLM logs within Event Viewer
On the Domain Controller(s) identified based on the Collection Device Hostname from step 1, open the Windows Event Viewer and navigate to Applications and Services Logs > Windows > NTLM > Operational. Right-click on Operational and select “Properties”.
Screenshot of Event Viewer highlighting the Properties option.
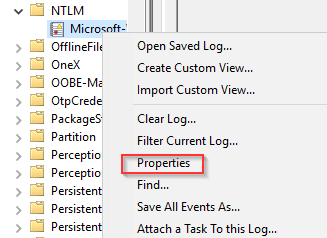
Screenshot of Event Viewer highlighting the Properties option.
In the Properties window, expand the storage size of the log from the default 1 MB to a larger size. We recommend no less than 20 MB as a starting point.
A screenshot showing the Properties tab with an expanded 20 MB log. For servers processing a large amount of authentication attempts, a larger log size may be necessary.
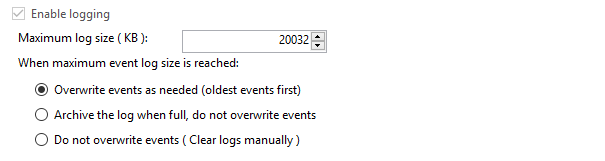
A screenshot showing the Properties tab with an expanded 20 MB log. For servers processing a large amount of authentication attempts, a larger log size may be necessary.
Save your changes and review the NTLM/Operational logs. Within the logs, locate an event with ID 8004 from the spoofed device we observed in Step 1 using the Find function. Once you have found a log that matches one of the malicious authentication events observed in the Varonis UI, use the Secure Channel Name field to identify the system the threat actor is targeting.
In the above screenshot, we see an event 8004 from the threat actor’s spoofed device, WINDOWS7. The highlighted values identify the username attempted (itadmin) and the target device for the malicious authentication, DESKTOP2.
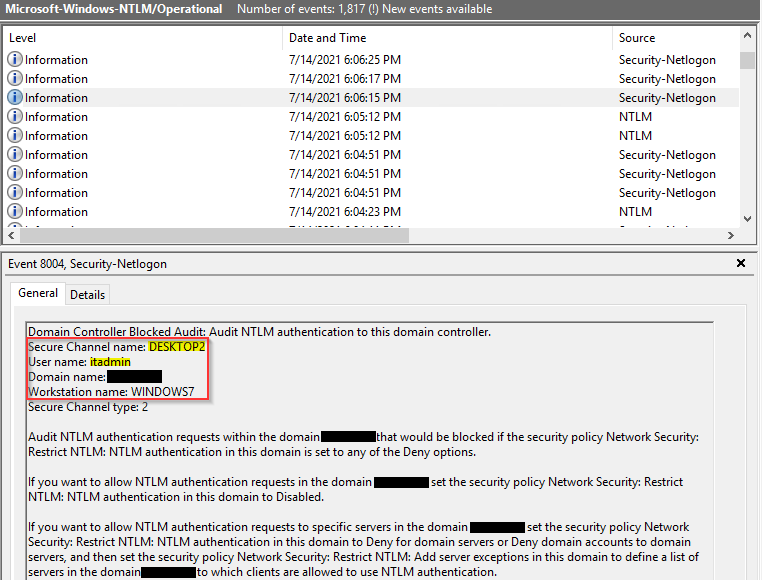
In the above screenshot, we see an event 8004 from the threat actor’s spoofed device, WINDOWS7. The highlighted values identify the username attempted (itadmin) and the target device for the malicious authentication, DESKTOP2.
Stage 5: Remediation
Now that the targeted system has been identified, we have multiple options to determine how the attacker is sending the authentication attempts. Two sources of data that can be used are as follows:
- Check firewall logs for connection activity to the target device occurring at the same time as the authentication attempts.
- If you do not see any indications of a successful suspicious authentication to the device, you may be able to log on to the victim device and use tools such as Netstat or Wireshark.
Threat actors will use tools like Shodan or custom scripts to search for devices with publicly exposed ports, which can then be targeted. These tools are likely the method used by the threat actor to identify the victim device in the first place. and frequently target port 3389, used for RDP, especially given the rise in the number of remote workers. However, we have also identified Radius servers and other authentication servers as frequent targets for threat actors.
In our example investigation, as we did not see any successful enumerations while investigating the activity, we connected to the target machine directly, and in running “netstat -anob” on the device, paired with the “findstr” command to limit results to port 3389, we identified a number of connections to the device via RDP sessions, as seen below.
A screenshot showing the output of netstat run on the target machine showing a plurality of connections to port 3389 (RDP).
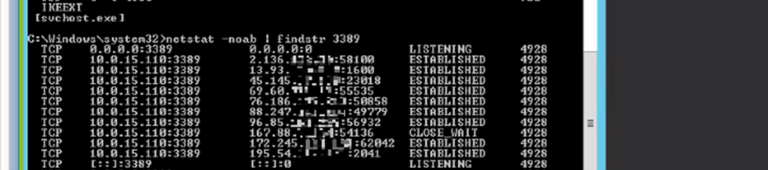
A screenshot showing the output of netstat run on the target machine showing a plurality of connections to port 3389 (RDP).
In your investigation, once you have identified the Source IP address, you can take specific remediation actions, such as closing ports on the target device if they are not required to be open, blocking the IP address or CIDR block of the source IP for the requests on your network’s firewall, and implementing tools on the target device to automate the blocking of IP addresses that attempt to brute-force credentials.
Remediation steps that reduce the attack surface for threat actors, such as enabling MFA for all users, disabling built-in usernames like “Guest” and “Administrator”, and enforcing a strong password policy based on recommendations from organizations like NIST or Microsoft, can be used as compensating controls, especially when direct remediation is not an option.
Conclusion
NTLM brute forcing and account enumeration activity is a common technique that threat actors of varying degrees of sophistication use to gain a foothold in an environment and is frequently a precursor to a larger cybersecurity incident. Identifying these attempts is critical to stopping cyberattacks before they begin, and prompt remediation helps to protect against exposure of sensitive data. Given enough attempts, threat actors will eventually make their way into the network as they narrow down their brute force attempts.
To validate remediations performed, we recommend reviewing activity from the source device in Varonis. You should see a reduction or complete halting of activity and alerts from the device.
The Varonis MDDR Team and IR Team offer cybersecurity analysis and remediation to Varonis customers. Contact your Varonis representative for details!


-1.png)