Amazon Web Services (AWS) Simple Storage Service (S3) enables users to organize and manage data in logical containers known as “buckets.” Amazon S3 is an object storage service offering scalability, data availability, security, and performance. Users can create these buckets by simply clicking “Create bucket” in the user interface or configuring them through code via CloudFormation.
In this article, we’ll explain how to create S3 buckets using CloudFormation, allowing you to reap the benefits of Infrastructure as Code (IaC) practices.
What is AWS S3?
AWS S3 is a highly flexible and secure object — or individual unit of data — storage solution. Its extensive cost, security, scalability, and durability customization options enable users to fine-tune their architecture to meet specific business and compliance requirements.
What is AWS CloudFormation?
CloudFormation, Amazon’s IaC service, makes setting up a collection of AWS and third-party resources easy. Rather than dealing with the complexities of traditional resource-specific APIs, you can streamline your process and manage your infrastructure more efficiently by creating and managing your AWS resources or infrastructure across accounts and regions through code.
Overview of AWS S3 bucket creation
Creating a bucket may seem simple; the intuitive user interface makes things like configuring access control and bucket access logs, enabling encryption, and adding tags an easy process. However, these manual tasks can require many specific, individual steps that complicate the process.
The most common problem we’ve seen is accurate replication. Although a developer may successfully create and configure a single bucket, managing multiple buckets across multiple accounts and regions becomes exponentially more difficult. CloudFormation is the solution to this problem.
S3 buckets with AWS CloudFormation
CloudFormation helps you create and configure AWS resources by defining them in your IaC. You can specify various resource attributes, like enabling encryption and setting up bucket access logging. For example, you can use the AWS::S3::Bucket resource to build an Amazon S3 bucket.
S3 bucket creation prerequisites

Before proceeding with bucket creation, there are several things to consider:
- CloudFormation permissions: Does the user have permission to create, update, and delete CloudFormation stacks? How about permissions to provision the resources listed in the CloudFormation template?
- Unique names: S3 bucket names must be globally unique, making it impossible to create buckets with the same name across different accounts. This also makes it unlikely that short, simple names will be available. To avoid this problem, plan your names well and try to namespace them using the environment or account ID. Alternatively, you can allow CloudFormation to generate random unique identifiers instead of specifying names.
- Future-proofing: If you think future analysis and reporting on a bucket is possible, think about how to organize the bucket structure best. For example, it's common practice to create subfolders per time period (year, month, day, etc.). Depending on how long data needs to be accessible, build life cycle rules to delete old objects or move objects between storage classes at fixed intervals.
- Regulatory requirements: Business and regulatory requirements may drive configuration decisions, but regardless of requirements, it's generally a good idea to enable bucket encryption and bucket-logging anyway.
- Version control system: To take advantage of IaC, resource files should be synced to a version control solution, such as git. This allows developers to identify, provision, or roll back solution iterations quickly.
How to create an S3 bucket
Here are the steps to create an S3 bucket with encryption and server access logging enabled.
1. Navigate to S3
From the AWS console homepage, search for S3 and click on the S3 service in the search results.
Figure 1: Navigate to S3 in the AWS dashboard.

Figure 1: Navigate to S3 in the AWS dashboard.
2. Create a new bucket
Click on the “Create bucket” button.
S3 bucket names need to be unique and can’t contain spaces or uppercase letters.
Selecting “Enable” in the server-side encryption options will provide further configuration options. Select “Amazon S3-managed keys (SSE-S3) to use an encryption key that Amazon will create, manage, and use on your behalf.
Click the “Create bucket” button at the bottom of the form, noting that additional bucket settings can be configured after the bucket is created.
3. Additional configuration
Once the bucket has been created, click on its properties to add additional functionality.
Figure 2: S3 bucket properties.
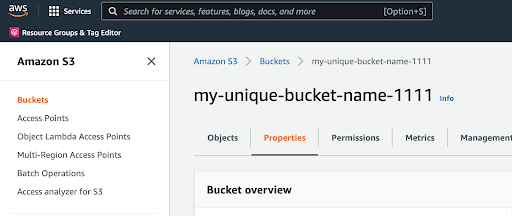
Figure 2: S3 bucket properties.
Server access logging can be used to gain insight into bucket traffic. Anytime an asset is accessed, created, or deleted, a log entry will be created. These logs include details such as timestamps and origin IPs. To enable server access logging, click the “Edit” button in the server access logging section of the bucket properties tab.
In the edit form, select “Enable,”, choose another S3 bucket to send access logs to, and click the “Save changes” button. If there’s not already another bucket to send logs to, create a new bucket and return to this step once that has been completed.
4. Automate using CloudFormation
We are now going to use IaC to repeat this process programmatically. Start by deleting any buckets manually created in previous steps so that the same process can be repeated and automated using CloudFormation.
5. Create an infrastructure file
Using the text editor of your choice, create a file named simple_template.yaml and add the following configuration:
		AWSTemplateFormatVersion: "2010-09-09"
Description: Simple cloud formation for bucket creation and configuration

Parameters:
BucketName: { Type: String, Default: "my-unique-bucket-name-1111" }

Resources:
AccessLogBucket:
Type: "AWS::S3::Bucket"
Properties:
AccessControl: LogDeliveryWrite

MainBucket:
Type: "AWS::S3::Bucket"
Properties:
BucketName: !Ref BucketName
BucketEncryption:
ServerSideEncryptionConfiguration:
- ServerSideEncryptionByDefault:
SSEAlgorithm: AES256
LoggingConfiguration:
DestinationBucketName: !Ref AccessLogBucket


Outputs:
MainBucketName:
Description: Name of the main bucket
Value: !Ref MainBucket
LogBucketName:
Description: Name of the access log bucket
Value: !Ref AccessLogBucket
This code contains several interesting snippets. First, it specifies an AccessLogBucket resource but does not specify a name, allowing AWS to generate a unique name automatically. Under properties, it stipulates that the bucket can be used as an endpoint for logs.
Next, it specifies the main bucket, references the user provider bucket name, specifies encryption, and sets the bucket location for logs by simply referencing the AccessLogBucket resource. These two blocks of code effectively describe the infrastructure created manually in previous steps.
Finally, the code returns the two bucket names as outputs to easily import into other stacks if required. The final step is to upload the code and create the resources.
6. Navigate to CloudFormation
From the AWS console homepage, search for “CloudFormation” in the services search bar, and open the CloudFormation service from the search results.
7. Create a new stack
Click “Create stack” and select “With new resources (standard).”.
Select “Upload a template file” and click “Choose file” to upload the code. Click “View in Designer” to see a graphical representation of the infrastructure.
The designer view will display an interactive graph that can be used to review or continue building a solution. Once complete, click the upload icon in the top left corner.
When specifying stack details, use a unique name for the stack and bucket names. Click “Next” once these have been provided.
On the next screen, scroll to the bottom and select “Next” to stick with default stack configurations.
On the final screen, you will see a summary of the work completed so far. Scroll to the bottom and click “Create stack” to create our resources.
Once the stack creation process begins, a screen with progress updates appears.
When the stack creation is complete, view all the created resources in the “Resources” tab.
Similarly, the “Outputs” tab will display the outputs configured in the code. In this case, those are the MainBucketName and the dynamically generated LogBucketName.
8. Confirm configuration
Now that the buckets have been created, they can be inspected in S3. Navigate to the bucket and examine its properties to confirm that default encryption and server access logging have been enabled.
Click the “Edit” button to inspect the server access logging configuration and verify the AccessLogBucket has been configured as the source of log delivery.
In under 30 lines of code, you can create and configure an S3 bucket. This code can be reused repeatedly to remove human error and create consistent configurations across environments, regions, and accounts.
Additional CloudFormation templates
The above example showed some of the common S3 configuration options. However, there are many more properties available to configure. Check out the official documentation.
S3 bucket FAQs
Q: What does S3 stand for?
A: Simple Storage Service.
Q: Will CloudFormation delete the S3 bucket?
A: This can be controlled by the user. By defining a deletion policy for a bucket, it can be configured to retain or delete the bucket when the resource is removed from the template, or when the entire CloudFormation stack is deleted. See the official documentation for using the DeletionPolicy attribute.
Q: Is creating an S3 bucket free?
A: Creating a bucket is free for anyone with an AWS account. The default limit for the number of buckets in any given account is 100, but there is no limit on bucket size or the number of objects that can be stored in any one bucket. AWS S3 costs are for storing objects. These costs can vary depending on the objects' size, how long they have been stored, and the storage class. For full details on S3 costs, see the official pricing guide.
Q: Who can create an S3 bucket?
A: The permission required to create a bucket is the s3:CreateBucket permission; if a user or service has been assigned a role with that permission, they can create a bucket.
Q: What is S3 bucket namesquatting?
With the sheer amount of data and users leveraging AWS, it’s easy for misconfigurations to slip through the cracks. One commonly overlooked area is the naming of S3 buckets.
AWS S3 bucket names are global, and predictable names can be exploited by bad actors seeking to access or hijack S3 buckets. This is known as “S3 bucket namesquatting.”
The use of predictable S3 bucket names presents a widespread issue. Thousands of instances on GitHub use the default qualifier, making them prime targets for exploitation.
Q: What are the benefits of using Infrastructure as Code?
A: IaC aims to eliminate manual administration and configuration processes, offering efficient development cycles and fast, consistent deployments. This enables developers to focus on writing application code and iterate features faster and more frequently.
AWS users often require many services configured in a particular way and duplicated across development, staging, and production environments. Defining this service architecture using IaC satisfies that requirement. This gives your configuration a single source of truth regardless of the environment. In particular, S3 configuration is essential because storage services are prime targets for attackers, due to the potential to access sensitive or valuable data.
Secure your AWS Environment.
By following some best practices for structuring AWS S3 and defining S3 configuration as code, the configuration will remain consistent and secure across environments. Similar to application code, this can undergo comprehensive peer review before deployment to production.
What should I do now?
Below are three ways you can continue your journey to reduce data risk at your company:
Schedule a demo with us to see Varonis in action. We'll personalize the session to your org's data security needs and answer any questions.
See a sample of our Data Risk Assessment and learn the risks that could be lingering in your environment. Varonis' DRA is completely free and offers a clear path to automated remediation.
Follow us on LinkedIn, YouTube, and X (Twitter) for bite-sized insights on all things data security, including DSPM, threat detection, AI security, and more.



.png)
